art deco

Showing posts with label Helpful hints and Kitchen tricks. Show all posts

Monday, February 6, 2017

Accessorizing your Home on a Budget- DIY wood sign

Home decor can add up so quickly especially if you like to change things up occasionally. There are so many great DIY projects that can give you great pieces for your home for little or no cost. I love this one I started with my sister last summer. We just used scrap wood our parents had around the house, but for this project you need a 10"x12" piece of plywood and four cuts of a 1x2 board: two that are 10.5" long and two 8.5" long pieces. Stain all pieces of wood on all sides and allow to dry thoroughly. 

Pick a quote or phrase that inspires you and design it graphically. For a small sign just use 1-2 fonts. Usually matching a serif font with a sanserif font and a simple with a more elaborate font will create more interest and the two fonts will complement each other. Design within a 7"x9" space, leaving an additional 1/4" border without any text. Use the layout of other quotes for inspiration to decide smaller and larger text as well as text placement. You can also use size and font to emphasize the most important part of the quote or phrase.

Print on your desired card stock. (or, if you're brave, freehand letter onto the paper using a fine tip sharpie.) I chose a neutral beige with a linen pattern. Cut down just larger than the opening (8x10"). Using spray adhesive, mount the printed quote centered onto the plywood. Next, properly arrange the 1x2" boards. First board all the way to the left side running along the top, the next running form the top edge down along the right side, the third aligned in the bottom right corner and laying across the bottom, then the last laying from the bottom left corner until it meets the edge of the first board. Secure each piece with wood glue.

Allow to dry completely and display with an easel or mount hardware on the back to hang on the wall.


Thursday, February 2, 2017

Enliven your Space

Do you ever find your space feeling a little drab? Maybe you think you need a whole house renovation or maybe you can't pin point anything you particularly don't like, but you also aren't in love with how it looks and feels...The good news is there are a few simple points that can enhance the overall tone and appearance without breaking the bank.

1. Make your space livable
There is nothing like a living plant (or something that mimics a living plant) to actually make your space come alive. Just a single potted plant or vase of flowers brings life into the space and makes for a beautiful accessory. Living plants make a great addition, but must be well kept in order to continue looking nice. If keeping up with the watering and trimming is not your thing, then the good news is you can always find beautiful fakes that look just as fantastic.

2. Shed a little Light on the Subject
Lighting is the single most important element of design. Lighting effects how you see everything else within the space. Your lighting can set the entire mood of the room or space. If you want the room to feel calm, relaxing, and serene use cooler and less direct lighting to wash the walls and accent focal points.  If you like your space to feel warm, cheerful, and lively then let light flood in! Use warm hues with the space fully illuminated. Utilize natural light whenever possible and let let lighting play a significant role in general purpose as well as accenting and accessorizing the space.

3. Connect personally
Every time you walk in the room you should be able to connect to the space emotionally. This happens when you display words or pictures with personal significance. Choose pictures or paintings with people you love or places you are passionate about. Have words or quotes that speak to your soul and reflect your ambitions. Let your space reflect who you are. Even the most simplistic things can leave an impression every time we see it.

Wednesday, January 18, 2017

Buying Containers????

I am definitely frugal and hesitant when it comes to purchasing anything...even small purchases. I put off my list of little things I want because I always feel like "I don't really need it" right now. This is not a wish list I'm talking about.  This is a list of practical household items like, a funnel for the kitchen, a mail organizer, and the biggest one....storage container for organizing. Maybe I have such a hard time buying containers because if I am going to spend money on one it had better be a good value, and be EXACTLY what I want and need. This criteria of exactly is hard to fill because either it is too particular or I have not yet identified exactly what that criteria is. On the other hand, if I can get containers without spending any money on them, then it is much easier to find one I like because I don't expect it to be absolutely perfect, I simply expect it to meet my needs.

As a result, my new favorite thing is to re-purpose those containers I get from things I am already buying. This is not exactly NEW; I have saved and reused containers before; however I always hated those labels that advertised what use to be kept in there. This project removes those unwanted labels, leaving a clean slate to store whatever you want in there!

This is for printed labels. (Post to come on removing sticker labels). Here's the secret:


All you need is fingernail polish remover- with acetone (or just straight acetone) and some cotton balls to do the scrubbing.

Saturate a cotton ball in the acetone solution. Rub over the entire surface or the entire section you are starting with. At this point it may not look any different, but let it sit on the surface as you go back and start to rub with the cotton ball. Rub in a small circular motion gently, then more firmly until the label starts to disappear and ink covers your cotton ball.


Replace with a new cotton ball as needed and continue to rub, until some vigorous scrubbing may be required in the end to finish it off.


Gently wipe it clean and its ready to be reused!

Monday, December 12, 2016

Best kept gingerbread house secret

This is by far the best way to construct gingerbread houses. Before learning this technique I feel like we would spend the entire time trying to get the walls to stand and just when you think you have it, they would all collapse again as soon as you attempt to put on the roof. It would just be an entire effort of frustration with little chance to enjoy decorating. This method has made gingerbread houses such a fun tradition with fun, happy memories to go with it.

I have used this technique both for classic baked gingerbread construction as well as graham cracker creations. The secret is simple: assemble the houses using nothing more than melted sugar. Don't hassle with frosting. The sugar hardens quickly and holds better than glue. It is perfectly safe to eat if the kiddies want to eat their creation when their done. For the little kids I even like to have the houses pre-assembled using sugar and then I give them each a bag of frosting to use with their decorating.

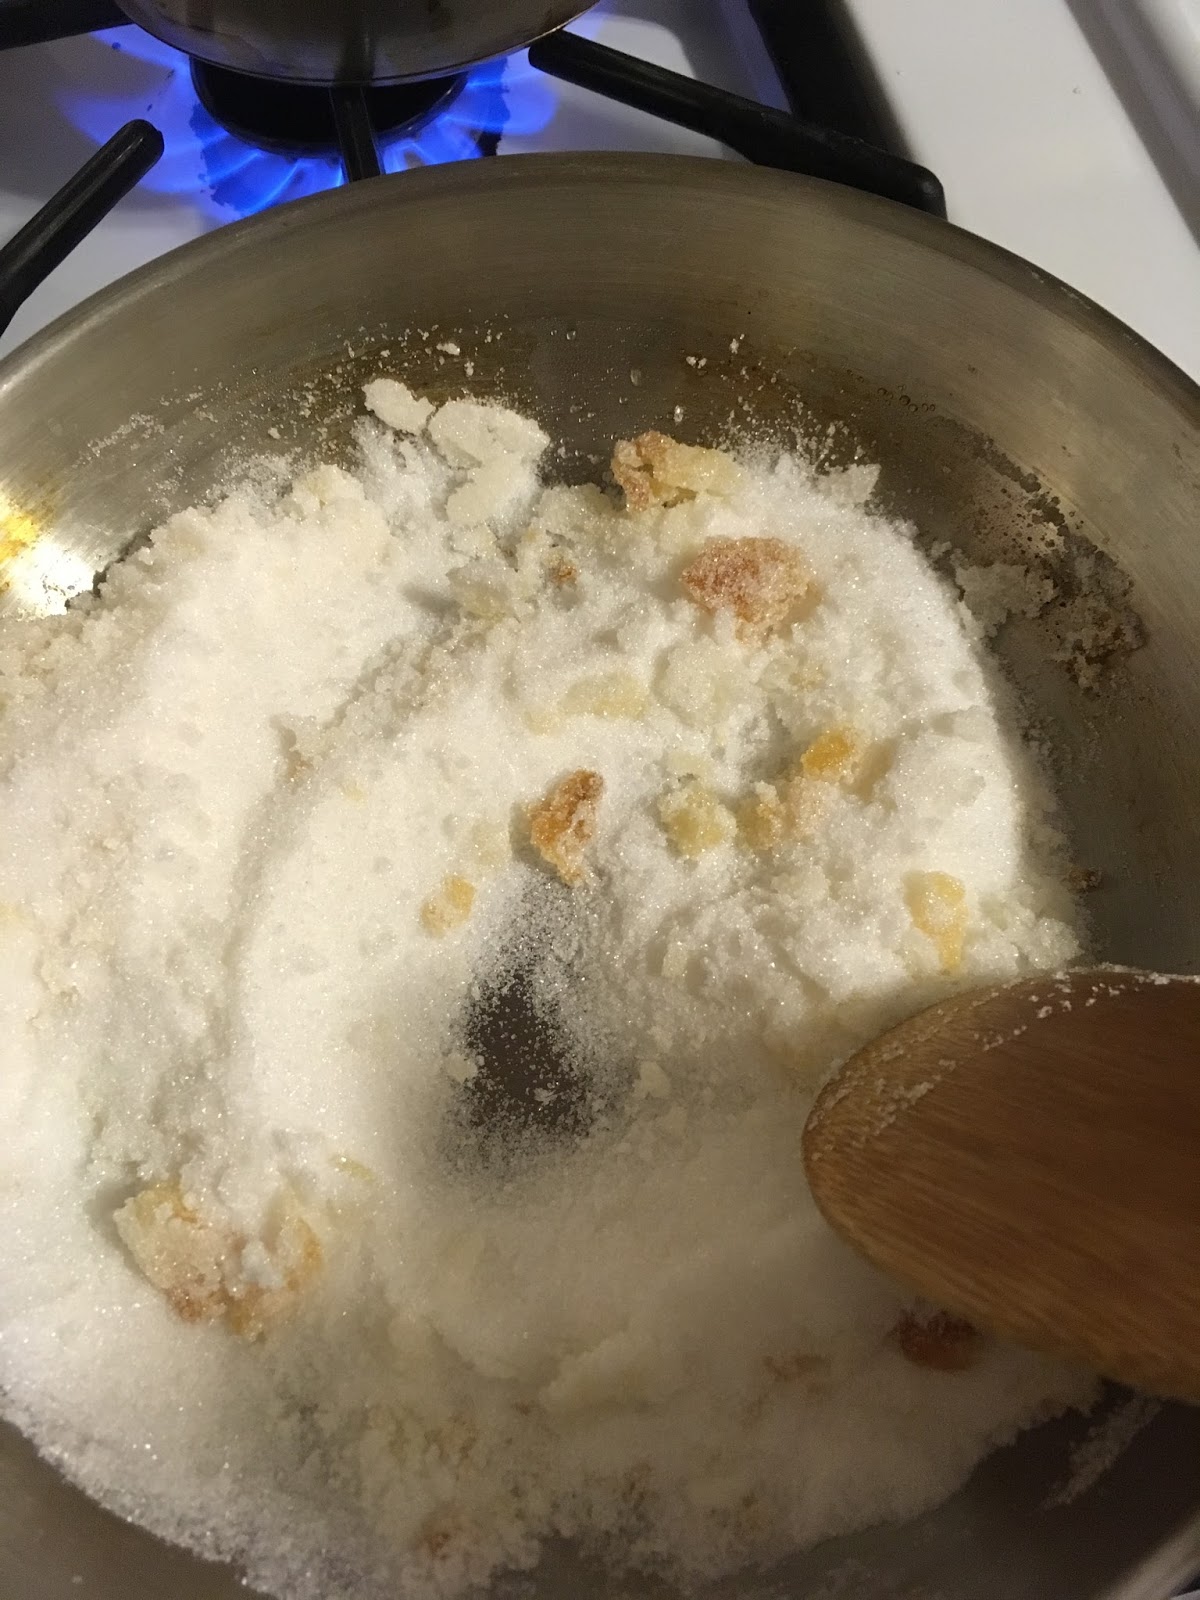
To start the sugar adhesive simply place a heap of sugar in a pan on the stove over medium low heat.


Watch the sugar constantly and stir frequently. It will crystallize into large chunks before liquefying. Just continue to stir and try to break up the clumps as they form. Be patient, but as soon as you start seeing liquid, it can start to burn quickly.

Because it starts to burn so quickly, I like to start to assemble the houses as soon as I start seeing some liquid sugar. Just dip one side into the sugar and quickly stick it to the adjacent side. Remember that the sugar is terrible hot and even the smallest amount can give a serious burn. Work quickly and continue to dip and stick until you are finished assembling while always keeping an eye on the progression of the sugar.
In the end you should have one or several good sturdy houses, ready for decorating!


Monday, November 14, 2016

Easy money saving tricks

I am absolute impressed by and admire those that do extreme couponing, but I am not one of them.  I know it takes a lot of searching, planning, and stocking which I just have not made the time to do it, let alone completely figure out how to do it. I do, however, have a few money-saving-tricks that hardly take any time and are easy to catch on to.

1.  Before paying for anything, I like to search Google to see if there is a coupon for it. Now this does not mean I go through every item on my grocery list, although I'm sure you could do that, but there are a few things where the return for your search time is usually larger than saving a few cents on your milk.
  • Search for store wide coupons at any department store. For example, I was shopping with my mother-in-law the other day at Kohls for a number of Christmas gifts. While standing in the check-out line I pulled out my phone and searched for "Kohls in store coupon". Within seconds, I had on my phone a 20% off coupon for the cashier to scan, taking $40 off of our $200 total....definitely worth the slight effort! 
  • Search for coupons before ordering online. A lot of stores will offer codes for free shipping or a certain dollar amount off when you spend a certain amount. I love when I find, just before placing my order, a $10 off a $40 purchase coupon.  Then I look at my $34 total and realize that I will actually SAVE $4 if I order an additional $6 item. 
  • I know it seems small, but REDBOX is another one that usually has a promo code available if you just look online. Sometimes, the code is for a completely free rental, but even saving $1 on your rental makes it only $0.50 and even just a dollar here and there really adds up. 
  • Whenever I go to any restaurant or even fast food, once again, I just type in google to see if there is a coupon. We have gotten free appetizers and desserts this way. I also often find BOGO deals and other little offers. 
2.  Sign up for Ibotta. It is easy to use and free. Best of all, if you use a referral code, you get an extra $10 just for signing up and redeeming your first rebate. Just enter in this referral code to get your added bonus: ehrphmm. This app is easy to use and usually has great offers. There are plenty of offers for just any brand products that you purchase on a regular basis like milk, eggs, and produce. You can also purchase a certain number of brand specific products and earn added bonuses as well to increase your cash return. It does not need to be done immediately either. Sometimes I scroll through the available rebates while my kids are playing at the park before our grocery run. Then I can scan the product bar codes as I put them away when we got home, and just like that I can earn a few dollars. Sometimes I go back and do it later which is also very simple if you save your receipt. It just means grabbing items out of the pantry or freezer to scan the codes. Especially with the initial $10 bonus, I feel like this app gives you a good return much more quickly and with less time input than some of the others I've tried. 

3. Be familiar with the stores that always have coupons available. Now I know this may mean that sometimes their price may be higher than competitors so the coupon is not significant, but this is not always the case. My two favorites are Michaels and Bed Bath and Beyond. Michaels typically has a 40% off a single item coupon, and sometimes you can wait it out for their special 50% of a single item coupon or 20% off your entire purchase coupon. For this reason I usually wait it out for buying certain craft supplies to take advantage of these. Such as buying something bigger like a new photo album or something I look for the 40 or 50% off coupon, but when I need a lot of little things like a set of acrylic paints for a project then I love my 20% off the entire purchase coupon. Also, in case you did not know with Bed Bath and Beyond, they take expired coupons and they will take multiple coupons (not for the same item, but within the same purchase). This could vary by store, but I have been told this at several stores. I don't shop there often, but when I do I always have a collection of coupons for 20% off a single item and for $5 off a purchase of $15 or more.  Once again, use these strategically to get the best bang for your buck. Items costing less than $25 use a $5 off coupon and group items together to total the minimum $15 if needed. Using basic math, any item costing more than $25 will give you a better return using a 20% off coupon. This is an awesome way to make your money go further especially in gift giving.  Bed Bath and Beyond, also affiliated with Buy Buy Baby, is great for weddings, baby showers, and even a lot of Christmas gifts too. 

A little extra thought can go a long way.  Most of the time, I don't even realize any time was spent in making a couponing effort.  It has become such a habit for me and I try to utilize time that would otherwise be spent just waiting. 
My philosophy with couponing is not to buy something just because you have a coupon for it, but if you are going to buy something anyways, definitely see if you can save a little money while doing it!

Thursday, November 10, 2016

Dinner time grocery run....not for me!

Early evening hours never seem to run that smoothly in hour house between kids that are cranky after waking up from their nap, kids that needed a nap but didn't have one, I'm usually exhausted and trying to get my hands free long enough to put a quick meal together.  Adding a run to the grocery store in the middle of that is out of the question. Planning out a weekly menu before the weekly shopping trip is ideal and definitely helps in preparation, but in all honesty, sometimes we forget ingredients or have to through together a last minute meal. Below is a chart of my favorite, tested and approved, recipe substitutions. 

When you need… Use instead:
1 tsp baking powder 1/4 soda+ 1/2 cream of tartar
heavy cream evaporated milk from the can 
shortening equal amount of butter 
1 cup sour cream 1 cup plain yogurt 
1 cup buttermilk 1 TBL lemon juice or distilled white vinegar + enough milk to make 1 cup
oil in baked goods equal amount of applesauce 
1 cup brown sugar  1 cup white sugar + 1-3 TBL of molasses (depending on light or darkness)
bread crumbs slices of bread in the food processor with an herb seasoning mix  or substitute cracker crumbs or dried stuffing mix
1 TBL fresh herbs 1 tsp of dried herb 
1 cup beef or chicken broth  1 beef or chicken bouillon cube + 1 cup of boiling water 
I have come to love these simple substitutions because most of the items are easy to always have on hand and they do not effect the outcome. I typically only buy heavy cream when we plan to make homemade ice cream, because otherwise it would go bad in my fridge. However, it is easy for me to always keep a few cans of evaporated milk in the cupboard and turn to that when I make soups, cream sauces, homemade caramel, and other recipes that call for cream. I also use it to replace half and half by combining it with a low fat milk. Once again, I have never purchased buttermilk, but this substitution works like a charm. I have even largely increased the ratio of lemon juice to milk and let it sit for a couple minutes until it really thickens to the consistency of sour cream, then used that in place of sour cream in recipes. That trick works great for cakes and sweet breads that use sour cream to keep them moist. 

Hopefully this list can help avoid last minute grocery runs and help prevent less frequently used ingredients from spoiling in your fridge!