art deco

Showing posts with label Homemade Gifts. Show all posts

Monday, January 23, 2017

Photo Coasters


I made these as a gift for my husband because he has taken a recent interest in photography. It is a great way to use and display some of his beautiful photos. I love these because they can be so personalized. They make a great gift and a beautiful accessory in your home.  They also are functional and inexpensive to make!

I decided to make a set of 6 coasters, but you can start with however many you'd like. First, I selected the photos I wanted to use and ordered them in a 4x6 print. I then went and found these cute hexagon white wall tiles at home depot. These little guys only cost .47 cents a piece! I bought 6 of them, and was ready start my project.

I started by using a scrap piece of paper to make a stencil for cutting all of the pictures to the right size. I traced the tile onto the paper and cut it out. I then used this stencil to cut all 6 pictures to the same size.

I used my spray adhesive to initially adhere the pictures onto the top of the tiles. Once they were centered on there and securely attached, I whipped out the Mod Podge. 

I did two coats of Mod Podge, letting it dry completely between each coat. The second coat was a good thick coat. 
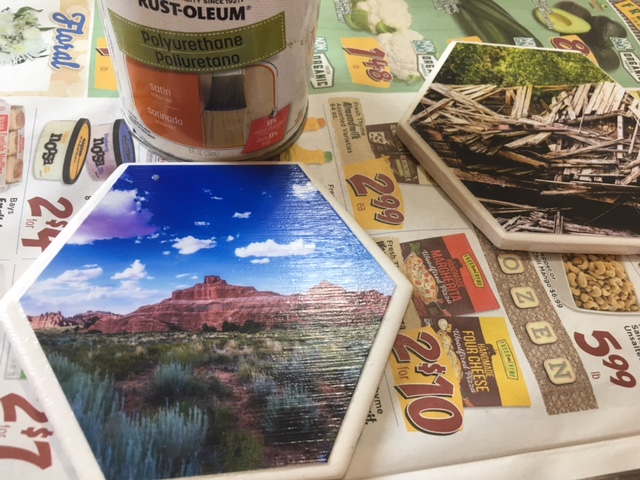
I finished it with a final thin coat of polyurethane to really protect them from moisture. 

I let these dry completely and finished them off with a soft felt bottom to keep the tiles from scratching my table or anything else. 
I bought two 8x11 pieces of this oatmeal colored felt. Each piece can fit 5 tiles worth of felt. I laid the tiles out on the felt and traced the exact shape of the bottom. I cut each one and measured it to the bottom. 

At this point, I used my favorite glue- E6000 to adhere the felt to the bottom of the tiles. (If you have not used this glue, you need to try it. It is my go-to for so many projects.)
Once the felt is attached to the bottom, you can flip the tile right side up and trim any pieces of felt that hang over the edge. Once that is dry, you are done!

Thursday, January 19, 2017

Homemade Ornaments

I know this post is coming late, but December was a busy month to keep up with all of the fun and creative festivities going on.  I have a friend that hosts an ornament exchange party every year. I was skeptical at first because I didn't feel like I had the money to go buy 10 nice ornaments for exchanging just to possibly get back 10 different ornaments that I may not even want. Then I realized that I can make my ornaments to bring so that the cost isn't too much of a concern, and I can design one that is actually meaningful to share without shopping all over town to find one that speaks to me.

In the end I was very happy with the result. The cost was low, they carried a story or sentimental value, and they looked pretty. They were very simple too. I made all 10 of them, plus a few extras, in an afternoon.

The recipe is simple:

  • 1/2 cup cornstarch
  • 1 cup  baking soda
  • 3/4 cup water
Combine all the ingredients in a saucepan over medium heat. Stir continuously until it starts to thicken and looks like instant mashed potatoes. 


At that point, remove the dough from the pan, cover it with plastic, and let it cool.  While it was cooling, I worked on my design. For the design you can use cookie cutters, cookie stamps, a number of different ideas such as a leaf or lace for imprints. I found a cookie cutter I liked for the shape and used the blunt tip of a mechanical pencil to trace a stencil for the design. 

Once it has cooled (about 20 minutes), knead the dough and form it into a nice smooth ball. 
Then roll it out to about 1/4" thick and cut your shapes.  Then add your design or impression if you would like. You can also just leave them smooth. Painting can be done later. 

You could use a straw to poke holes at the top for threading a string through, but I decided to make hooks to loop my string through. I made my hooks from paper clips.  I could get three hooks from each one. 


 I inserted these into the top of each ornament, carefully making sure the ends were secured into the center of the thickness of dough. 
Lastly the ornaments need to dry out and harden.  You can leave them out on the counter for at least 24 hours to accomplish this, or if you're more impatient like me, you can do this in the oven. Turn your oven on very low- like 170 degrees, and leave them in for about an hour. I repeated mine on both sides just to be sure. 

At this point they are ready to go. Use an ornament hook or ribbon to thread through each hook and hang on the tree. You can also paint them if you'd like. I brushed each of mine with a light gold metallic acrylic paint to give them some extra sparkle.