art deco

Monday, January 30, 2017

Trash to treasure: end table makeover


I love this trash to treasure concept because it creates a beautiful cycle of people getting to purge themselves from their own cutter or things they don't need, while others can transform, reuse, or re-purpose those same items to create something beautiful and fill a need in their own space.

I apologize for only having an "after" shot of this project. While I was putting on the final polyurethane for this project, my toddler snatched my phone after watching me take pictures of the project. He then continued to enjoy taking his own photos, which I didn't bother to stop because I was mid-project and didn't think he was hurting anything. I was absolutely wrong. Next thing I knew, my phone was swimming in the toilet! My photos had not backed up to the cloud, and with the phone destroyed, so were all of the "before" photos. 😨!!!

I have had this on my mind for a while...that I would love I nice little side table to go right there. My husband wasn't convinced, and it wasn't a priority purchase, so the idea continued to be put off. Then just last week I was on my way home from dropping my son off at a birthday party and I spotted this little guy along the side of the road. (Along with a little stool, which will be another Trash to Treasure post.)  It is actually a kiddie table- hence the little stool seat that went with it. I already have a kid's table to I almost passed it up. Then my mind started thinking of the end table I've been wanting so I quickly turned the car around to grab the table (and the stool too). I figured it couldn't hurt. If I got it home and it didn't work, then it could just as easily be dumped at my curb to be passed on to someone who could use it. But, lucky for me, it filled the space nicely and I decided to give it a finishing touch.

I didn't do much to this project. The table was already white, which is the color I wanted. The table top had a few stains on top, but nothing too severe- easily covered by a coat or two of paint.
I did to a quick sanding over the top to smooth things out and to help the paint adhere to the surface.
I also used a chalk paint mix which adheres to surfaces really well in the first place. The surface area isn't too big so I was able to use paints I had on hand to create a nice color I wanted.

I wanted the table white, but not too white....definitely subdued from the blinding white of "simply white" chalk paint. I added my sued acrylic paint to the mix until it resembled the color I was looking for. (approximately 3 Tbl of Suede for a 1/2 cup of Simply White)

The table took two coats of paint to cover completely. Once it was dry, I used my block sander to lightly brush over the top. This smooths out any unevenness in the paint coats and lessens the emphasis of the brush strokes. After wiping the table clean with a dry cloth, I applied 2 coats of my satin finish polyurethane to protect the top.


As for the final touch, when everything was dry I added my own felt feet to the table. You could use the sticky back felt pads you can buy at the store, but I used some scraps of felt I already had to protect my wood flooring.

Simply cut a piece of felt to perfectly fit the foot of each table leg and glue into place using my favorite, E6000 glue.
Considering I only used things I had on hand, and the table itself came off the side of the road, this trash to treasure project, was FREE, and I finally have a beautiful end table to enjoy!
Once he saw the finished project, my husband surprisingly admitted that he really loved the look of the table right there and thought it made a big difference in the room.

Delicious and Nutritious: Pumpkin Biscuits

I found this recipe when I was looking for a quick bread I could whip up to go with dinner. I made a recipe of Pumpkin Biscuits that I found, and I loved them. When I went to make them again; however, I thought I could make them a little better for you so there was no guilt making them as a delicious dinner side dish. My family loves biscuits, but they are so loaded with butter and then doused with more fat or sugar when you go to eat them too.

This recipe is fantastic. My entire family enjoyed them, and the recipe substitutions did not effect the taste or texture of the final product. This does still contain fat and sugar, but they are sweetened with honey, there is significantly less butter, and they use pumpkin and coconut oil as additional fat sources.

Just look at that pumpkin-cinnamon deliciousness!


For this recipe I started with my buttermilk substitution (see my tested and approved recipe substitutions). You can use actual buttermilk in this recipe, but that is something I never buy because it is so easy to substitute in any baking recipe. I added some lemon juice to my milk and let it sit while I combined the dry ingredients to really get a good buttermilk forming.


In a medium bowl I combined my wheat and white flour, baking powder, salt, and baking soda.

Then I cubed my butter before cutting it into the dry ingredients. You want your butter to be very solid. For this you can pull it straight from the refrigerator. I like mine to sit out for 15 minutes or so before using it so it is a little more workable, but room temperature butter will not work properly.


Add the cubed butter to the dry ingredients and the solid coconut oil then cut them into the dry ingredients. For this I like to use my handheld potato masher, but a fork works well too, or even just your hands.
Work until the mixture is course crumbs. No large butter or coconut oil chunks left in it.

By this time your buttermilk substitute should be ready to go. Mix the pumpkin puree and honey with the buttermilk, then add that entire mixture into the crumb mixture. Fold it in until the two mixtures just combine to form a dough.


Turn the dough out on a floured surface to knead. This kneading process is to layer the dough. Fold the dough in half over itself and then press it out to fold again. Do this several times and roll into a 1/2" thickness.


Use a biscuit cutter, cookie cutter, or the top rim of a cup to cut circles from the biscuit dough. Place 1" apart on a lined or greased baking pan.


Bake in an oven preheated to 425 degrees for 16-18 minutes. While baking, mix up a delicious cinnamon butter to spread on the hot biscuits.

Cinnamon Butter: 3 Tablespoons softened butter with 3 teaspoons of cinnamon.


Spread butter on the top of each biscuit straight from the oven. Serve them warm with some honey to drizzle on top. Enjoy!


Nutritious Pumpkin Biscuits 
Yields: 8-10 biscuits           Bake: 425 degrees for 16-18 minutes

Ingredients:
  • 1 cup white flour
  • 3/4 cup wheat flour
  • 2-1/4 tsp baking powder
  • 1/2 tsp salt
  • 1/4 tsp baking soda
  • 3/4 cup pumpkin puree
  • 1/3 cup buttermilk
  • 2 Tbl honey
  • 1/4 cup butter, cold
  • 1/4 cup coconut oil, cold and solid
Cinnamon butter:
  • 3 Tbl butter, softened
  • 2 tsp ground cinnamon 

Thursday, January 26, 2017

Cute little Christmas Tree Brownies


I made these little treats for my son's preschool Christmas party, and he loved them! I was trying to find a treat that was cute and fun for my son to be excited about, but also that I could reasonably produce over 40 of them. These were exciting for the kids and delicious for the adults there. My inspiration for these were my favorite mint brownies. It is basically a fudgey brownie with green mint frosting on top and decorated with a string of melted chocolate, some red sprinkles, and a yellow M&M star on top.

Like I said, I had to make about 4 dozen, so I wanted to keep it simple. Besides, I don't believe there is a from scratch brownie recipe that can beat a good boxed brownie, and believe me, I have been on never ending search to find one. I followed the box directions for mixing up the brownies, but put them in a pan larger than suggested to make them thinner. For example, instead of an 8x8 pan, bake in a 9x13, or instead of a 9x13 bake in a half sheet pan. Because they are thinner, you will need to reduce the baking time. Start the timer for 8 minutes less than the suggested baking time then check your brownies and add time from there if needed. (Probably not more than 3 minutes of additional time.)

While baking or cooling, you need to whip up the mint frosting. This recipe is really an approximate. It is the basis of my frosting, but I have done it enough, that I go off of flavor and consistency more than precise measurements, so taste and observe to make the frosting just how you like it.

  • 1/2 cup butter, softened
  • 1/2 tsp vanilla
  • 1-2 tsp peppermint extract 
  • approximately 6 drops of green food coloring
  • 4 TBL milk (more if needed)
  • 4 cups powdered sugar

Beat butter until light and fluffy. Add milk, vanilla, peppermint extract, and green food coloring then beat until just incorporated. Add powdered sugar, one cup at a time, and beat in each addition. Add additional milk if needed. Sample for flavor, and add more peppermint extract if needed, 1/4 tsp at a time.

When the brownies have cooled, spread evenly with the frosting. Melt 1/2 cup of semi-sweet chocolate chips in the microwave for 50-60 seconds. Stir and add 1 Tbl of vegetable oil to thin it out. Use a fork to splatter over the frosted brownies in a random, but decorative design. Then add the sprinkles for extra decoration if you'd like.

Let the chocolate set. (Just a couple minutes in the refrigerator will do the trick.) Then cut in a triangle pattern to maximize the number of trees you can produce. Every row will have a half a tree left on each end, but the rest is used perfectly. Carefully remove the triangles, then top with a yellow M&M and let the kiddos enjoy!


Monday, January 23, 2017

Photo Coasters


I made these as a gift for my husband because he has taken a recent interest in photography. It is a great way to use and display some of his beautiful photos. I love these because they can be so personalized. They make a great gift and a beautiful accessory in your home.  They also are functional and inexpensive to make!

I decided to make a set of 6 coasters, but you can start with however many you'd like. First, I selected the photos I wanted to use and ordered them in a 4x6 print. I then went and found these cute hexagon white wall tiles at home depot. These little guys only cost .47 cents a piece! I bought 6 of them, and was ready start my project.

I started by using a scrap piece of paper to make a stencil for cutting all of the pictures to the right size. I traced the tile onto the paper and cut it out. I then used this stencil to cut all 6 pictures to the same size.

I used my spray adhesive to initially adhere the pictures onto the top of the tiles. Once they were centered on there and securely attached, I whipped out the Mod Podge. 

I did two coats of Mod Podge, letting it dry completely between each coat. The second coat was a good thick coat. 
I finished it with a final thin coat of polyurethane to really protect them from moisture. 

I let these dry completely and finished them off with a soft felt bottom to keep the tiles from scratching my table or anything else. 
I bought two 8x11 pieces of this oatmeal colored felt. Each piece can fit 5 tiles worth of felt. I laid the tiles out on the felt and traced the exact shape of the bottom. I cut each one and measured it to the bottom. 

At this point, I used my favorite glue- E6000 to adhere the felt to the bottom of the tiles. (If you have not used this glue, you need to try it. It is my go-to for so many projects.)
Once the felt is attached to the bottom, you can flip the tile right side up and trim any pieces of felt that hang over the edge. Once that is dry, you are done!

Thursday, January 19, 2017

Homemade Ornaments

I know this post is coming late, but December was a busy month to keep up with all of the fun and creative festivities going on.  I have a friend that hosts an ornament exchange party every year. I was skeptical at first because I didn't feel like I had the money to go buy 10 nice ornaments for exchanging just to possibly get back 10 different ornaments that I may not even want. Then I realized that I can make my ornaments to bring so that the cost isn't too much of a concern, and I can design one that is actually meaningful to share without shopping all over town to find one that speaks to me.

In the end I was very happy with the result. The cost was low, they carried a story or sentimental value, and they looked pretty. They were very simple too. I made all 10 of them, plus a few extras, in an afternoon.

The recipe is simple:

  • 1/2 cup cornstarch
  • 1 cup  baking soda
  • 3/4 cup water
Combine all the ingredients in a saucepan over medium heat. Stir continuously until it starts to thicken and looks like instant mashed potatoes. 


At that point, remove the dough from the pan, cover it with plastic, and let it cool.  While it was cooling, I worked on my design. For the design you can use cookie cutters, cookie stamps, a number of different ideas such as a leaf or lace for imprints. I found a cookie cutter I liked for the shape and used the blunt tip of a mechanical pencil to trace a stencil for the design. 

Once it has cooled (about 20 minutes), knead the dough and form it into a nice smooth ball. 
Then roll it out to about 1/4" thick and cut your shapes.  Then add your design or impression if you would like. You can also just leave them smooth. Painting can be done later. 

You could use a straw to poke holes at the top for threading a string through, but I decided to make hooks to loop my string through. I made my hooks from paper clips.  I could get three hooks from each one. 


 I inserted these into the top of each ornament, carefully making sure the ends were secured into the center of the thickness of dough. 
Lastly the ornaments need to dry out and harden.  You can leave them out on the counter for at least 24 hours to accomplish this, or if you're more impatient like me, you can do this in the oven. Turn your oven on very low- like 170 degrees, and leave them in for about an hour. I repeated mine on both sides just to be sure. 

At this point they are ready to go. Use an ornament hook or ribbon to thread through each hook and hang on the tree. You can also paint them if you'd like. I brushed each of mine with a light gold metallic acrylic paint to give them some extra sparkle. 

Wednesday, January 18, 2017

Buying Containers????

I am definitely frugal and hesitant when it comes to purchasing anything...even small purchases. I put off my list of little things I want because I always feel like "I don't really need it" right now. This is not a wish list I'm talking about.  This is a list of practical household items like, a funnel for the kitchen, a mail organizer, and the biggest one....storage container for organizing. Maybe I have such a hard time buying containers because if I am going to spend money on one it had better be a good value, and be EXACTLY what I want and need. This criteria of exactly is hard to fill because either it is too particular or I have not yet identified exactly what that criteria is. On the other hand, if I can get containers without spending any money on them, then it is much easier to find one I like because I don't expect it to be absolutely perfect, I simply expect it to meet my needs.

As a result, my new favorite thing is to re-purpose those containers I get from things I am already buying. This is not exactly NEW; I have saved and reused containers before; however I always hated those labels that advertised what use to be kept in there. This project removes those unwanted labels, leaving a clean slate to store whatever you want in there!

This is for printed labels. (Post to come on removing sticker labels). Here's the secret:


All you need is fingernail polish remover- with acetone (or just straight acetone) and some cotton balls to do the scrubbing.

Saturate a cotton ball in the acetone solution. Rub over the entire surface or the entire section you are starting with. At this point it may not look any different, but let it sit on the surface as you go back and start to rub with the cotton ball. Rub in a small circular motion gently, then more firmly until the label starts to disappear and ink covers your cotton ball.


Replace with a new cotton ball as needed and continue to rub, until some vigorous scrubbing may be required in the end to finish it off.


Gently wipe it clean and its ready to be reused!

Best Cinnamon Rolls Ever

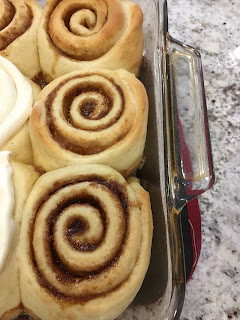
I have made a variety of different cinnamon roll recipes and sampled a number of others as well, and these are definitely at the top of the list.

In addition to the recipe itself, another tip to a good cinnamon roll, is to actually get a good tight roll on it.  The tighter the roll, the more layers, and more layers make for more cinnamon goodness.


Start the dough with the active dry yeast sprinkled over warm water and let it sit for a couple minutes to foam and bubble nicely. Make sure the water is simply warm and not hot. Put your wrist under the running water to determine a good temperature of feeling warm without being hot.

Meanwhile, melt the butter and warm the milk. A microwave will do for both of these tasks.

Mix the melted butter, milk, egg, sugar, and salt together. Then add the foaming water and yeast to the mix. Add the bread flour 1 cup at a time, mixing between each addition, or running a stand mixer on low with the dough hook attached.

Let the dough rise for approximately 1 hour, or until the dough has doubled in size.

Turn the dough out on generously floured surface. Roll into a 10x17 inch rectangle.

Spread softened butter evenly over the dough, and heavily spread the brown sugar/cinnamon mixture all over. (You may add chopped pecans spread on top of cinnamon sugar.)

Roll tightly along the long end into a tight log. Work your way slowly along the edge with a pinch and tucking method into the tight roll.

Take a piece of unflavored floss or multi-purpose thread, approximately 12 inches long. Slip under one end of the log, 1.5 inches from the edge, bring up both ends of the thread and cross them over the top. Pull tightly to cleanly sever, without squishing the log.

Place the disks about 1 inch apart in a glass 9x13 pan. Cover with plastic wrap and let rise for 45 minutes.

Bake in an oven preheated to 350 degrees for 15-20 minutes, until the edges are lightly golden, but not dark.
Combine cream cheese, 1/4 cup softened butter, confectioners sugar, vanilla, and milk.
Spread or pipe frosting over warm rolls.


For the Dough:
  • 1/4 cup warm water
  • 1 pkg active dry yeast (2 1/4 tsp)
  • 1/4 cup melted butter
  • 1 cup warm milk
  • 1/2 of a 3.4 oz. package of instant vanilla pudding mix
  • 1 egg, room temperature
  • 1 Tbl white sugar
  • 1/2 tsp salt
  • 4 cups bread flour
For the Filling:
  • 1/2 cup butter, softened
  • 1 cup brown sugar
  • 4 tsp cinnamon
  • (optional: 3/4 cup chopped pecans)
For the Frosting:
  • 1 (4 oz) pkg cream cheese
  • 1/4 cup butter, softened
  • 1 cup confectioners' sugar
  • 1/2 tsp vanilla
  • 1-1/2 tsp milk
Serves: 12-16            Total Time: 2 hrs. 40 minutes        

Monday, January 16, 2017

DIY Storage Box

This is my latest project in attempt to organize our play room. Some organization and rearranging was absolutely necessary to fit some new Christmas toys into our tiny space.

I loved this project because I didn't have to spend a cent (considering I had some extra fabric and basic craft supplies on hand), and it was quick enough to whip up 3 of them in about an hour. Now there are a lot of variations of this same idea, but I chose this method because it was the quickest and most cost effective for me.  Just using my handy hot glue, it is a no-sew method. (One day I may go back and sew a quick 4 seam liner for the inside of the box, but for now it was unnecessary, and therefore quicker to leave that out.)

For this project you will need:

  • 1 sturdy cardboard box
  • a square of fabric that covers the bottom and wraps up all 4 sides of box + 1 inch
  • hot glue
  • paint (optional)

I started by selecting a good sturdy box. Or in my case....3 boxes. Try to peel off the paper or shipping labels without damaging the box. If there are still markings or stickers on the box and your fabric is thin, cover the box in a quick coat of paint to give it an even tone under the fabric.

Lay the fabric out and set the box, right-side-up, in the center. Lay the box to one side, give the edge of the fabric a double roll towards the box, and glue inside along with rim. Roll to the opposite side, making sure the fabric lays smoothly over the box. Repeat the double roll and glue.


With the two opposite sides glued, lay the box onto an unglued side. Lay the fabric smoothly onto the side facing up, and tack down with some glue as needed.  stretch the corners out in a nice triangle fold, cross over the box, and glue it down. Make another triangle flap and cross it over the first, then tack it down. Flip the box over to take all layers of fabric into a double roll, glued along the edge inside the box.
Repeat with the last unglued side.


Just like that, the envelope wrap box is finished and ready for storage!